Saturday, September 5, 2009

10 Fingerprints to God

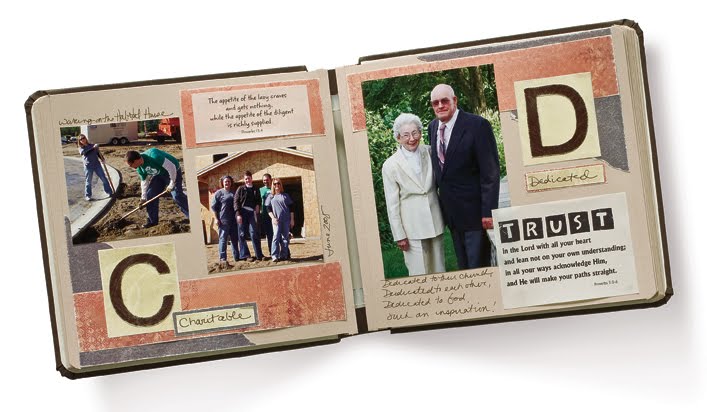
I found this online at the CM site. Enjoy and I hope it helps you with your album.

Find your 10 Fingerprints
Your life is brimming with stories, and this process will help you find what we call the “fingerprints of God.” So what are these fingerprints? They are important events that may have seemed insignificant at the time, but turned out to be pivotal in setting the direction of your life. Follow the steps below to help identify your fingerprints:

Answer the 10 Questions
These questions will help you think chronologically about your life and how your faith has grown and developed. As you read each question, jot down a few thoughts on index cards or on the computer.
1.What was religion/faith like in your childhood home? Was church going or other faith-based events part of your life? Did anything memorable (good or bad) happen as a child/teen, and how did your faith in the Lord play a part in it?
2.Who most influenced your beliefs? How did family, friends, teachers, school (i.e., parents, grandparents, relatives, pastors, youth group leaders, etc) affect your beliefs?
3.How did you come to know Jesus Christ as your Savior? Did you have a re-dedication of your life? What other significant experiences have you had when you felt the Lord moving you closer to Him?
4.How did you see the Lord leading, protecting and guiding you through your dating experiences? If you are married, how did you meet your spouse? How has the Lord grown your faith through your marriage victories and struggles? Are you re-married? What happened? If you are single or single again? What significance does the Lord’s presence have in your life?
5.If you are a parent, or if you interact with children on a regular basis, how has your faith been affected by them? Have you adopted a child? How did the Lord lead you in that process?
6.How did you start on the path that led you to the career path you are on today? How did the Lord use circumstances, people, etc., to get you here? How has your faith affected the people with whom you work? Have you been on a mission trip? How did that affect you?
7.What faith lessons have you learned through an adversity? Have you ever felt like you hit rock bottom and, by God’s grace, you bounced back? Has the Lord “bailed you out” of a mistake?
8.How has music or other forms of artistic expression influenced your faith? Do you have favorite songs or hymns? Perhaps you’ve been influenced by sacred dance, beautiful art, drama, Christian radio, certain music groups, etc. What happened to encourage or convict you?
9.What scripture verses have been especially meaningful in your life? Do you have a favorite scripture(s)? Why is this passage meaningful? How has the Lord used His word in your life?
10.How has the Lord provided for your needs or answered a specific prayer? How has He healed you or sustained (protected) you physically or emotionally?

Journal your memories
With your thoughts and photos organized, write down more detailed accounts of your faith memories and the impact they had on your life.

Look at your pictures
Now look through your photo albums to find pictures that go with each question. Your photos may spark new memories and new answers to some of the 10 Questions.

When you have completed these steps, click Choose Your Album Style on the right navigation bar.

Thursday, September 3, 2009

It's the Cuttlebug

I want one of these really soon too!

Cuttlebug Sandwhiches

Cuttlebug Sandwhiches:
I'm definately going to put this in my Cricut Binder:

Cuttlebug Sandwiches - Important Sandwiching Notes:

· Always err on the THIN side; you can pass the sandwich through the machine again, but if you start out too thick, you can potentially break a plate or otherwise hurt your new ‘bug!
· If a cardstock or chipboard shim is noted, always try the sandwich without first, then add cut-to-size (the size of the plates) cardstock or chipboard layers until the appropriate thickness of the sandwich is determined.
· Based on feedback, the space inside the Cuttlebugs differ from machine to machine, so be SURE to error on the THIN-STACK side!
Cardstock
Chipboard
Magnetic/ Metal Sheets & Thin cork (Media)
Cuttlebug Dies
Plate “A”, Plate “B”, Die (cutting side up), Cardstock, Plate “B”
Plate “A”, Plate “B”, Die (cutting side up), Chipboard, Plate “B”
Plate “A”, Plate “B”, die (cutting side up), Media, Plate “B”


Cuttlebug Embossing Folders
Plate “A”, Plate “B”, Folder (with cardstock inside), Plate “B”
Plate “A”, Plate “B”, Folder (with chipboard inside), Plate “B”
Plate “A”, Plate “B”, Folder (with metal sheet inside), Plate “B”
Nestabilities
You will need Spellbinders Tan Embossing Mat to emboss in
Cuttlebug™ machine (or a plumbers gasket cut to size, or some use a mouse pad)
Cutting Sandwich - (Stack from bottom up)
1. A plate
2. C plate
3. Spellbinders Die (cutting side up) that means the side with the
ridges
4. paper or cardstock
5. B plate
6. Run through Cuttlebug™ machine.
Embossing Sandwich- (Stack from bottom up)
*Remove C Plate for embossing sandwich
1. Place A plate on bottom
2. Leave die face up on A plate with die cut still in the die.
3. Place one Spellbinders Tan Embossing Mat on top of the die.
4. Use 2 or 3 pieces of cardstock to shim.
*Cautionary Note: Using more than 3 pieces of cardstock to
shim Cuttlebug Embossing sandwich will result in B Plate
breakage. When using Spellbinders Edgeabilities card making
dies, shim with only 2 pieces of card stock.
5. Place two acrylic B plates on top of sandwich and run thru
Cuttlebug machine to emboss Spellbinders die cuts.
6. Turn die over and use like a stencil with inks and chalks for
added detail.
BigShot Embossing Folders
Plate “A”, Plate “B”, Folder (with cardstock inside), Plate “B”, Cardstock shim
BigShot Large Dies
Plate “B”, Cardstock, Die (cutting side down), Plate “B”


Revolution Dies
Plate “A”, Plate “C”, Die, Cardstock, Plate “B”


Sizzlit Dies
Plate “A”, Plate “B”, Die (cutting side up), Cardstock, Plate “B”
Note: Provocraft suggests using Plate” C” instead of the second Plate “B”, however, CB owners have cracked plates, so try with two “B” plates first.
Sizzix Original Dies & other Steel Rule Dies
Plate “B”, Cardstock, Die (cutting side down), Plate “B”
Plate “B”, Chipboard, Die (cutting side down), Plate “B”


Sizzix CutNFold Dies
Plate “A”, Die, Cardstock, Plate “B”, Chipboard shim
Also try:
Plate “B”, Cardstock, Die, Chipboard shim (maybe 6 layers)
Sizzix Embossing Folders aka Simple Impressions
Plate “A”, Plate “B”, Folder (with cardstock inside), Plate “B”
Also try:
Plate “A”, Chipboard shims, Folder (with cardstock inside), Plate “B”


QuicKuts Dies (Regular)
Plate “A”, Plate “B”, Die, Cardstock, Plate “C”
Plate “A”, Plate “C”, Die (cutting side up), Chipboard, Cardstock shim, Plate “B”


QuicKuts Dies (Grand)
Plate “A”, Plate “B”, Die, Cardstock, Plate “C”


Brass Embossing Stencils
Plate “A”, Plate “B”, , Brass stencil ,paper/cardstock,mouse pad (cut to size, rubber side down), Plate “B”
Sandwich may need to pass through several times based on cardstock thickness
Or use plumber’s black rubber plus red rubber gasket, instead of mouse, then add last plate B.
Big Impressions Texture Plates
Plate “A”, BI texture Plate, Cardstock, Silicone Rubber pad (from BISK), Impressions Pad (from BISK)
*BISK-Big Impressions Starter Kit
Fiskars Texture Plates
Plate “A”, Fiskars texture Plate, Cardstock, tan Wizard pad, black or tan Wizard pad, (possible Cardstock shim,) Plate “B”
Also try:
Plate “A”, Fiskars texture Plate, Cardstock (lightly misted with water), 2 layers Fun Foam, Chipboard Shim, Plate “C”
Also try:
Plate “A”, Fiskars texture Plate, Cardstock (right side towards TP), Rubber Plate (made from Plumber’s rubber gasket), Plate “C”


Plastic thin stencils
Plate “A”, Plate “B”, , Brass stencil ,paper/cardstock,mouse pad (cut to size, rubber side down), Plate “B”
Here too- may try
Plate “A”, Plate “B”, , plastic stencil, ccrdstock, black rubber, red rubber, plate B

New Look, New Blog!

Well, here is my first post in my new blog. Hopefully this one will also be the last. As far as scrappin' is concerned. It's really late and I should be in bed, but ..... well I'm just not there yet! :O)

Wednesday, September 2, 2009

Latest Projects


Here are some of my latest projects. I finally figured out how to do a border. Let me know what you think.


Testing DS


Here is my sweet kisses jar! I'm still learning my cricut and DS. But I thought this was cute.


My sweet kisses jar.

My Latest Creation

Here is my latest creation. I made this from the Design Studio. George Cart.